 You've deployed your Next.js application to Vercel and everything seems to be running smoothly. But then you encounter a cryptic error: "An error occurred in the Server Components render. The specific message is omitted in production builds to avoid leaking sensitive details." With no way to debug what's happening, you're left scratching your head and digging through code that worked perfectly in your local environment.
This frustrating experience highlights why proper logging is crucial for Next.js applications in production. Without adequate logging, you're essentially flying blind when issues arise on Vercel's platform.
Why Logging Matters for Your Next.js Application
Effective logging provides a window into your application's behavior, especially in production environments where you can't directly observe execution. For Next.js applications on Vercel, logging is particularly important because:
Server Components and API routes execute in serverless functions, making traditional debugging methods ineffective
Production environments behave differently than development environments, revealing issues that weren't apparent during testing
Vercel's error messages in production are intentionally vague to prevent security vulnerabilities
User-reported issues are nearly impossible to reproduce without contextual information
As one developer on Reddit expressed their frustration: "Every time I deploy, there's some uncaught error that my VSCode didn't catch. I would check each and every file for errors before pushing my code and there wouldn't be any errors. But only after I deploy to Vercel, it catches it and gives me an error."
Understanding Vercel's Logging System
Vercel provides built-in logging capabilities that capture different aspects of your application's behavior. Understanding these log types is the first step toward effective logging management:
1. Build Logs
These logs are generated during the build process and show all actions taken to compile and prepare your Next.js application for deployment. They're useful for troubleshooting build failures but don't help with runtime issues.
2. Runtime Logs
Runtime logs capture HTTP requests and serverless function execution during your application's operation. These are the most important logs for debugging production issues and include:
Function invocations
HTTP request details
Console output from your application code
Errors thrown during execution
3. Activity Logs
These record user actions and project changes, such as deployments, domain configurations, and team member activities. They're helpful for audit trails but less relevant for application debugging.
Best Practices for Logging in Next.js on Vercel
1. Choose the Right Logging Library
While you can use console.log for basic logging, dedicated logging libraries provide more structure and features that are essential in production:
Winston: Popular and highly configurable with many transport options
Pino: Performance-focused logger with lower overhead
next-logger: Specifically designed for Next.js applications
As one developer comparing options noted: "There are many logging solutions. For Winston vs Pino, Winston is more feature-rich while Pino is more performance-oriented."
2. Implement Log Levels
Use appropriate log levels to categorize your messages based on severity:
ERROR: For critical issues that prevent functionality
WARN: For non-critical issues that might indicate problems
INFO: For tracking normal application flow
DEBUG: For detailed diagnostic information
This approach allows you to filter logs based on importance, especially useful when you're flooded with information.
3. Structure Your Logs
Unstructured logs are difficult to parse and analyze. Use structured logging (typically JSON format) to make your logs more searchable and analyzable:
// Unstructured (hard to parse automatically)
console.log(`User ${userId} performed ${action} at ${timestamp}`);

// Structured (machine-readable)
logger.info({
  event: 'user_action',
  userId: userId,
  action: action,
  timestamp: new Date().toISOString()
});
4. Secure Your Logs
A common concern among developers is log security: "Many logging APIs, frameworks leak identities, sensitive information, etc." To address this:
Never log passwords, tokens, or sensitive user information
Mask or truncate potentially sensitive data like emails or IDs
Be careful with error objects that might include stack traces with sensitive information
5. Use Centralized Logging
Vercel's built-in logs have limitations - they're not permanent and can be inconsistent. As one developer complained: "Vercel runtime logs show up inconsistently at best."
To address this, forward your logs to a centralized logging service:
Logtail: Simple setup with good free tier
Axiom: Well-integrated with Vercel
Sentry: Excellent for error tracking
Datadog: Enterprise-grade monitoring
Setting Up Logging in Next.js
Let's implement a basic but effective logging solution using Winston. Follow these steps:
Step 1: Install Winston
npm install winston
# or
yarn add winston
Step 2: Create a Logger Module
Create a file named logger.js at the root of your project:
import winston from 'winston';
const { combine, timestamp, json, printf } = winston.format;

// Custom format for readable logs in development
const devFormat = printf(({ level, message, timestamp, ...meta }) => {
  return `${timestamp} ${level}: ${message} ${Object.keys(meta).length ? JSON.stringify(meta, null, 2) : ''}`;
});

// Determine if we're in production
const isProduction = process.env.NODE_ENV === 'production';

// Create the logger with appropriate configuration
const logger = winston.createLogger({
  level: isProduction ? 'info' : 'debug',
  format: combine(
    timestamp(),
    isProduction ? json() : devFormat
  ),
  transports: [
    new winston.transports.Console({
      stderrLevels: ['error'],
    }),
  ],
});

export default logger;
Step 3: Use the Logger in Your Application
Now you can import and use your logger throughout your Next.js application:
// In a page or component
import logger from '@/logger';

export default function HomePage() {
  logger.info('Home Page rendered', { page: 'home' });

  // Log errors properly
  try {
    // some risky operation
  } catch (error) {
    logger.error('Operation failed', {
      error: error.message,
      stack: process.env.NODE_ENV !== 'production' ? error.stack : undefined
    });
  }

  return <div>Home Page</div>;
}
Step 4: Integrate with Vercel
To view your logs in Vercel's dashboard, use console.log methods in your application code. Vercel automatically captures console output from your serverless functions.
For a more robust solution, integrate with a third-party logging service. For example, to use Logtail:
Create an account on Logtail
Get your source token
Install the Logtail transport:
npm install @logtail/winstonUpdate your logger.js:
import { Logtail } from '@logtail/winston';

// Add this to your transports array
new Logtail('YOUR_SOURCE_TOKEN')
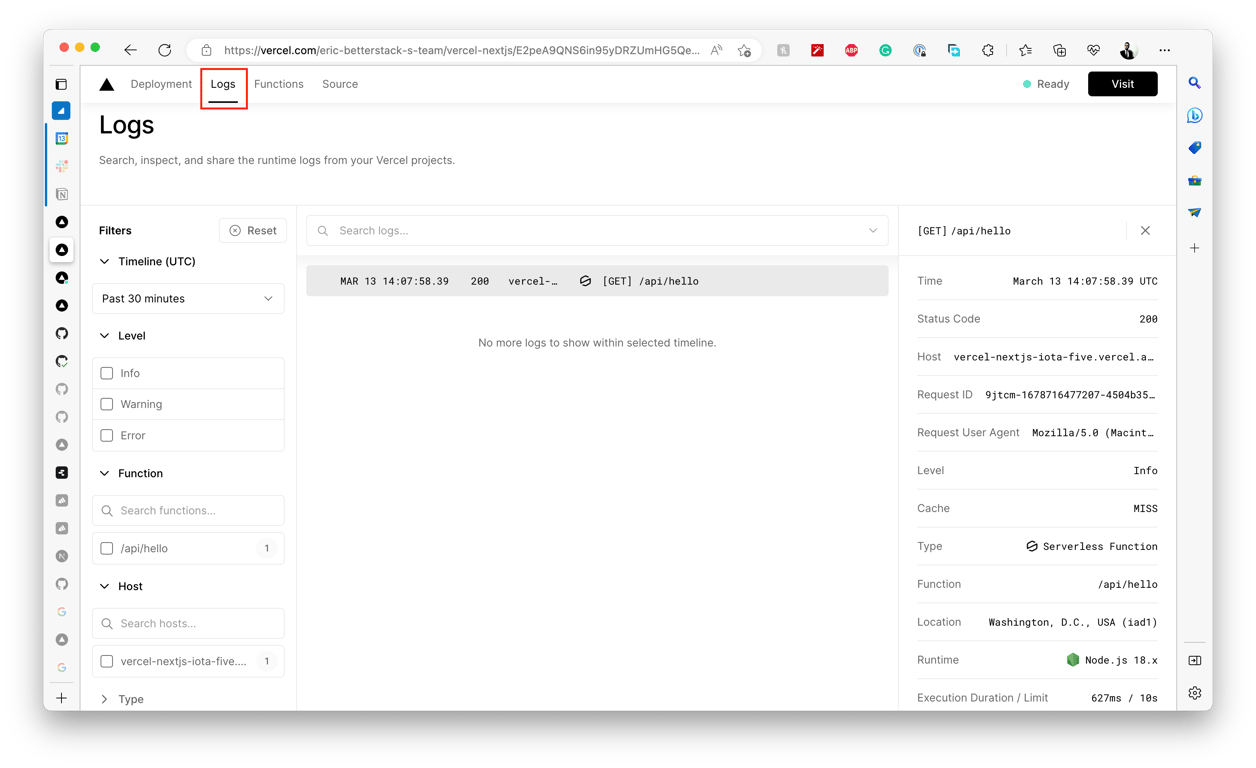
Accessing Logs on Vercel
Viewing Logs in the Vercel Dashboard
Navigate to your project in the Vercel dashboard
Click on the deployment you want to inspect
Select the "Runtime Logs" tab
Use filters to narrow down logs by date, status, or type
Using Vercel CLI for Logs
For terminal access to logs, you can use the Vercel CLI:
# Install Vercel CLI globally
npm install -g vercel

# Login to your Vercel account
vercel login

# Pull logs for a specific deployment
vercel logs your-deployment-url.vercel.app

# Get real-time logs
vercel logs your-deployment-url.vercel.app -f
Common Pitfalls and How to Avoid Them
1. Excessive Logging
Problem: Logging too much information creates noise and increases costs.
Solution: Be selective about what you log. Use debug level for detailed information and higher levels (info, warn, error) for more important events.
2. Inconsistent Vercel Runtime Logs
Problem: As many developers have noticed, "Vercel runtime logs show up inconsistently at best."
Solution: Test logging locally before deploying using next build && next start and implement a third-party logging service for more reliability.
3. Logging in Server vs. Client Components
Problem: Next.js 13+ uses both server and client components, which behave differently with regard to logging.
Solution: In client components (marked with 'use client'), logs appear in the browser console. In server components, logs appear in Vercel's runtime logs. Design your logging strategy accordingly.
4. Missing Critical Information
Problem: Generic log messages without context make debugging difficult.
Solution: Include relevant identifiers and context in all logs:
// Bad
logger.error('Database query failed');

// Good
logger.error('Database query failed', {
  operation: 'getUserProfile',
  userId: user.id,
  queryParams: params,
  errorCode: error.code
});
Conclusion
Effective logging is essential for maintaining and debugging Next.js applications on Vercel. By implementing structured logging with appropriate detail levels and integrating with centralized logging services, you can gain valuable insights into your application's behavior in production.
Remember that logging is not just about debugging—it's about visibility into your application's health and performance. A well-designed logging strategy will save you countless hours of frustration when troubleshooting issues that only appear in production.
Start by implementing the Winston logger as shown above, then consider expanding to more sophisticated solutions like Sentry or Datadog as your application and team grow. With proper logging in place, you'll never again be left in the dark with cryptic error messages on your Vercel deployments.


